


When the sun sets on March 22nd, 2023, Ramadan begins for Muslims across the globe. At Bella Luna Toys, we love to learn about the many different traditions celebrated by our customers and friends across the world.
Ramadan takes place during the ninth month of the Islamic lunar calendar, and lasts 29-30 days depending on the lunar cycle. Followers of Islam celebrate the month of Ramadan as a time of heightened spiritual devotion and rejuvenation. At the end of the 29-30 days, Eid-al-Fitr is celebrated with delicious sweets and exchanging of Eid gifts.

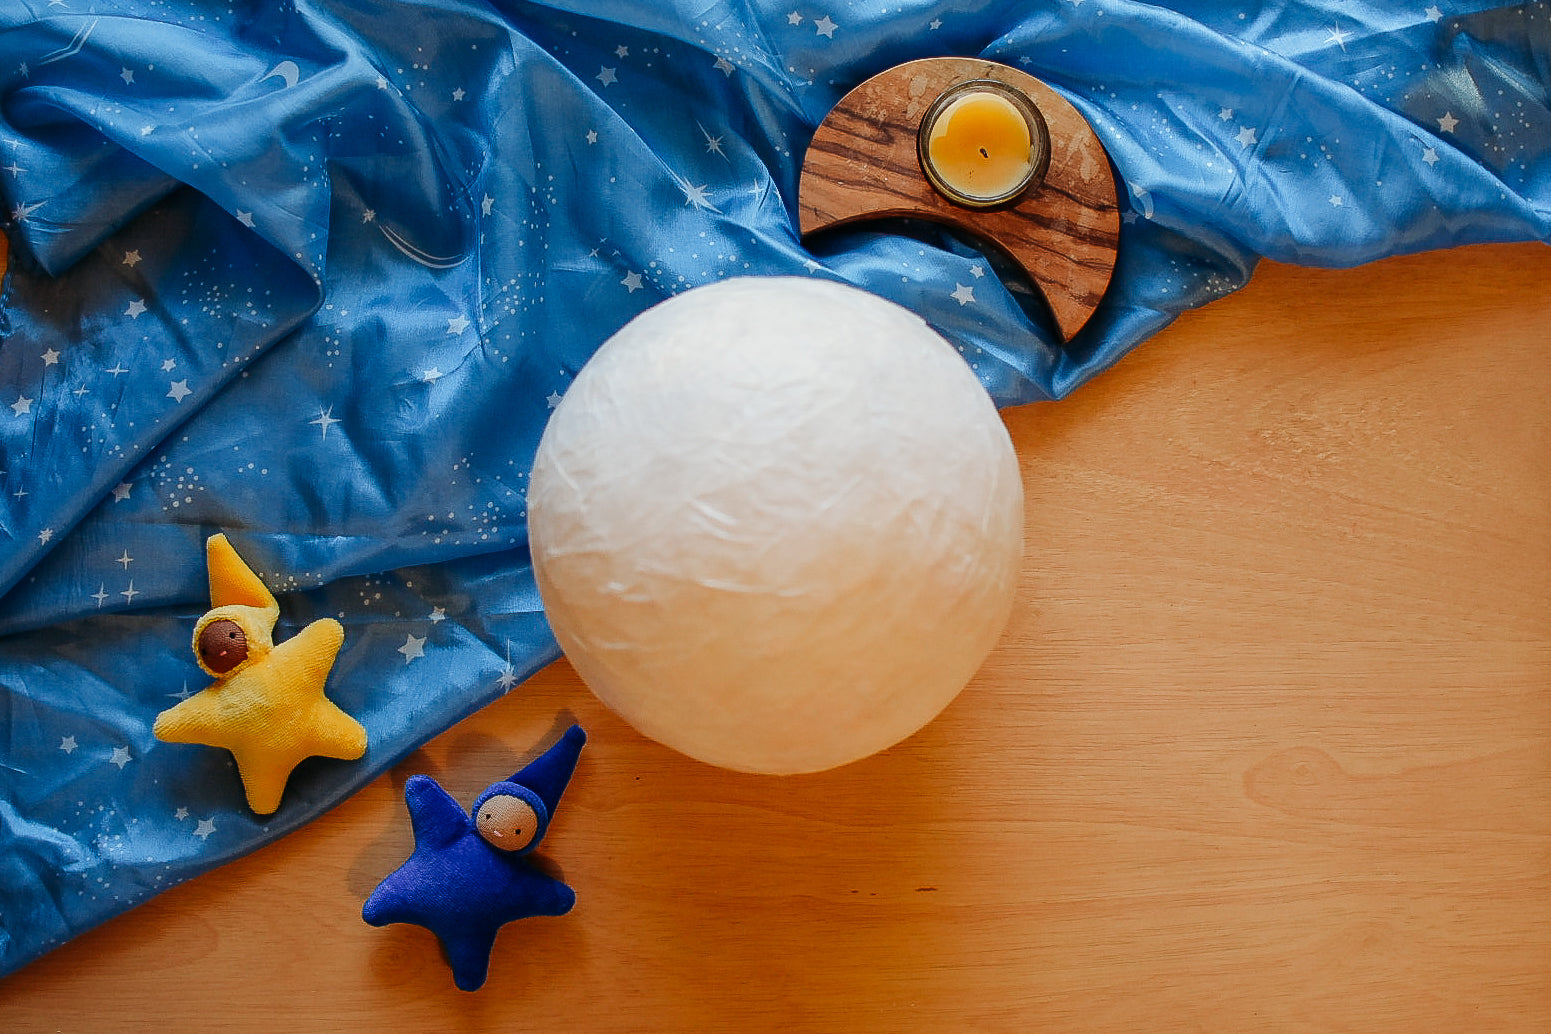
Opening students hearts and minds up to different cultures and their celebrations is an important part of Waldorf education. Introducing diverse cultures and world views helps children develop empathy and a curiosity to explore and learn more about our world. Today, we are making a moon lantern to celebrate the beginning of Ramadan for those that practice, and to open that conversation up with children learning about the holiday.
Gather Your Supplies
- Tissue paper
- White glue or Mod-Podge
- A balloon
- A glue brush
- A circular cookie cutter, bowl, or jar lid to mark the opening of the lantern
- An led tea light
- Optional: Yarn to form a handle, watercolor paints

Begin To Paper Mache
First, you will need to cut your tissue paper into smaller sheets that will be workable across the balloon. Then, pour your glue into a bowl where you can dip a brush into it. Now, blow up your balloon to the size you'd like your lantern to be.
You now can begin to dip your brush into the glue and spread it across the inflated balloon. Spread a layer about as big as you plan to cover with one or two sheets of tissue paper. If any area of tissue paper does not stick to the balloon, go over those spots with the glue brush and more glue. Do this gently though, as tissue paper is prone to rip when it is covered in glue.

Cover the entire balloon with a layer of tissue paper. Repeat, adding at least three more layers of tissue paper to form a sturdy shell over top of the balloon. Place in a bowl or hang it up from the balloon tie to dry for at least 24 hours.
Let It Dry
Once the paper mache is dry, use your circle shaped stencil, bowl, jar lid or whatever you have on hand to mark a circle around the tie of the balloon. This will be where you pull the balloon out of the paper mache lantern shape, as well as the opening for the LED candle.

Once you've marked your opening, you can now cut the tie off of the balloon. Then cut outwards to cut along the traced circle. The balloon may immediately peel itself away from the shell of paper mache, but it doesn't always. If it stays stuck, gently peel it away toward the center of the lantern. It may pull some of the paper mache towards the center, as well. Simply push these areas back out to reshape.

Personalize Your Lantern
Now is the part where you can decide how to embellish your moon lantern! We kept ours looking like a full moon, but you could use watercolor paints to paint an actual moon phase onto it. Paint one half or three quarters of the sphere a deep blue and paint the remainder yellow or leave it white and you now have a specific phase of the moon! Or if you would like your moon lantern to travel on outdoor walks or to hang around your home, use a lucet and yarn to fingerknit a handle in whatever length you prefer. Use a hole punch or a small knife to poke out two holes on opposite sides of the opening in the lantern. Then tie your fingerknitted yarn into those holes and you have a beautiful handle!
The very last piece of this craft is adding the LED candle! We would not recommend using actual lit flame candles in these due to the possibility of fire hazard. But an LED tea light works wonderfully to light up your moon! Since we were keeping our lantern a full moon, we simply flipped it with the hole on the bottom, and put the candle in that space. It glowed like our orbiting friend in the sky.

Use the time you and your children are adding the glue and tissue paper to talk about how people around the world celebrate Ramadan, and why it is such an important month of the year. Make sure to read up on Muslim traditions and ways of observing Ramadan, and be comfortable enough with the information to answer questions as they come up, or be prepared with somewhere in which you and your child could look up the answer. Learning about other cultures, religions, and ways of life are important parts of children’s emotional and educational development.

Leave a comment