


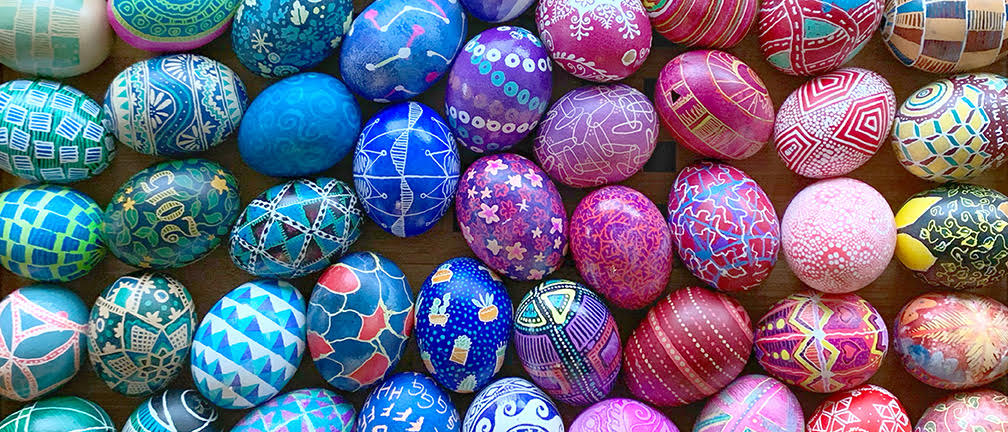
Birds are chirping, flowers are blooming and there's a hint of spring in the air. For Cathy Heck and her family, this means egg decorating season is at hand! She has been creating Ukranian inspired Pysanky eggs for many years now through dozens of egg-making sessions, some of which have turned into full blown Egg parties with friends and family.
Cathy has written a tutorial on pysanka inspired egg making so you can join in this fun tradition, too! Her daughter Margaret began when she was 7 years old, after watching her big sisters making magic eggs, and now, 20 years later, she is the families most prolific egg maker!

The egg-decorating method described below has been used for thousands of years by Ukrainian families. This year, our hearts go out to those families. As we make each little egg, we wish and hope that peace will return. If able, please consider donating to UNICEF to help aide families and children suffering during this humanitarian crisis.
The art of pysanky is a wax-resist and dye process much like batiking. Traditional Ukrainian eggs include many symbols, and even the colors have meanings. You can find many of the Ukrainian symbols, as well as excellent step-by-step instructions, in the Ukrainian Easter Egg Decorating Kit, which also includes the important supplies that you will need.
Gather Your Supplies

- Eggs (white eggs yield brighter results)
- Egg Blowing tool
- Kistka (tool for writing with wax)
- Beeswax
- Pysanka Dyes
- Vinegar
- Hot Distilled Water
- Containers for Mixed Dyes (we use glass jelly jars with wide openings)
- Spoons and Pencils
- Cloth tape measure or ribbon if needed for drawing circles around your egg
- Candles and Candle Holders or Plates
- Drying Stands (can purchase or use three long thumbtacks for each egg pushed through base of cardboard)
- Vinyl Gloves – powder-free
- Paper Towels
Blowing the eggs
Blowing your eggs a few days in advance gives them plenty of time to be completely dry before dyeing. To blow the eggs, you can use either the two-hole method and blow one end with your mouths, or use an egg-blower like Aunt Marge’s Egg Blower, an amazingly simple tool for emptying your eggs. Let the eggs dry.
Prepare Your Work Area
Because wax and dyes can spill and drip, spread a big sheet over a large table. Cathy often makes the dyes the night before, so they have plenty of time to cool, but they can be made the same day if you let them cool to room temperature. This is important, because you do not want your dyes to melt the wax. Using Ukrainian Pysanka Dyes, follow the directions on each package. Some colors have slightly different instructions. Mix them in jars with wide openings for dipping your eggs into.
How to Begin
Pro Tip 1: Always hold your kistka at a 90-degree angle to the surface of the egg for the wax to flow freely. Sometimes, you will also find it a bit easier to turn your egg while holding your kistka in place. And don’t worry. It just takes a few trial eggs to get the hang of it.
Pro Tip 2: There’s no such thing as a bad egg! Every egg is beautiful in its own way. Cathy's family loves looking at the way their egg-decorating styles have developed through the years.

Today Margaret chose to use a traditional Ukrainian pattern to illustrate this age-old process. Heat your kistka over the candle, and then with the warm metal, scoop up a bit of beeswax. Reheat, then close the hole with a dot of wax, so that the egg doesn’t fill with dye when you dip it.
Scoop up a bit more wax, reheat, and begin “writing” with the wax on the surface of your white egg. The areas that are covered with wax will appear WHITE, NOT colored. After you have saved the parts of your design that will be white, dip your egg into your first dye color. Usually it is yellow, or one of the lighter colors. Generally, it’s best to go from lights to darks.
When you gently turn your egg in the dye, you will notice that the waxed parts remain white. Because your egg is empty inside, it wants to float, but you can gently push it down into the dye with a spoon.

Now, continue writing or drawing with the wax over the yellow parts that you want to save as YELLOW. When you have finished saving all that you want to be yellow, place the egg in a darker color. For example, below, Margaret has used the orange dye.
 You can repeat this process as many times as you like. We usually repeat about 4 or 5 times. But even one-color eggs are beautiful and intriguing. For Margaret’s egg, next, she covered areas that she wanted to save as ORANGE. And then dipped her egg into the dark red dye. You will notice that your eggs need to stay in the dyes for different amounts of time depending on both the color of the dye and the egg itself.
 Next, Margaret drew with the wax over the areas that she wanted to remain DARK RED. And, finally, the last color Margaret used was blue. Now here is an example of the unexpected magic that can occur when working with Ukrainian dyes. You will notice that some of the dyes don’t blend, but rather overdye the previous colors. In this case, the blue didn’t blend with the dark red to make a purple, but rather overdyed it blue. These are some of the wonderful surprises that happen when you partake in this delightful art.

When you have completed all the colors you want to save, it’s time for the most fun of all. Removing the wax. Often your egg will be completely black from the wax darkening. And then, the surprise is even greater. To remove the wax, hold your egg slightly above the candle flame, until the wax begins to melt, then gently wipe it with a paper towel. Continue. And little by little, your masterpiece will be revealed. The residue wax will leave a nice protective sheen, but you can also add varnish or even nail polish.
 There you have it. One perfectly beautiful egg-shaped treasure! So, of course, time to start another. And another ... and ... and ... It’s too mesmerizing to stop! So, after Margaret made one, she had to make 8 more.
Her second egg honors the Ukrainian people who introduced us to this beautiful artform. Margaret used the colors of the flag and traditional images that symbolize love, strength, protection, good health and wisdom.

And, happily, after a few years, you, too, will have a treasure chest full. And all of your little egg-makers will be big egg-makers. As you can see below, Margaret, who began decorating eggs with her sisters at age 7, is still making eggs, AND has brought a new egg-maker into the family. He is hooked, and almost always makes a dozen at a sitting, so their collection of eggs just keeps growing. We hope yours does too. Happy egg season from Cathy's family to yours!

Cathy Heck is an illustrator and has been licensing artwork for children’s products for over 30 years. She is the mom of three daughters, who worked by her side as toddlers, and continued through their college years and beyond. Today the Heck family of artists create new designs every day for children all over the world through their online shop, Mej Mej. You can find fabric wall decals and wallpapers, as well as personalized wall decor and baby gifts. And, all are designed, printed and shipped from their studio in Virginia Beach, Virginia, USA. Enjoy following Cathy and Mej Mej on Instagram.


Leave a comment