


Cheep cheep! Do you hear that? It's the sound of spring! To bring some springtime cheer to your home we have a very special craft created by Isabel of @thefeltedacorns! With this tutorial, you can make a fuzzy Easter egg with a fun surprise inside--a cute little chick. Add this little egg to a nature table or as a fun surprise in an Easter basket!
You'll use dry needle felting and wet felting to complete your project. While needle felting is best done by older children or adults, wet felting is fun and easy for preschool aged children and older!
Materials
- High density foam pad
- 38 star gauge felting needle
- Enough yellow wool (3 g) to make your chick and a pinch of orange and black wool
- At least 15 g of wool for eggs
- A 3” wooden egg (or a plastic egg that's been taped together)
- 1 Nylon stocking
- A towel
- Soap of your choice
- Warm water
- Scissors
- Tapestry needle
- Thread
Felting the chick

Begin by gently pulling two small pieces away from the larger tuft of yellow wool. These will turn into your wings later! Set them aside.

Wrap the large piece of yellow wool tightly around itself and needle felt it into your desired chick shape. My chick is roughly the size and shape of a large plump grape. Just remember the wool will shrink as you felt it in place and your chick will need to fit inside your egg.
Felt the chick by repeatedly inserting and removing the needle into the wool. The little barbs on the tip of the needle will agitate the fibers, felting them together! Needle felt your chick until firm. Do a “pinch test” by pinching the fibers away, if very little pull away then you’re finished!
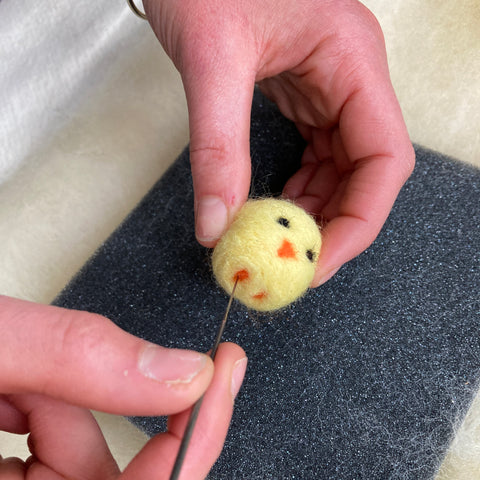
Next, felt a pinch of orange for the chick's break and felt it into its desired shape directly onto the chick. Then, felt two teeny tiny pinches of black wool for the chick's eyes. Finally, take two pinches of orange and needle felt too small ovals to the base of the chick, on either side of the beak, for the feet.

Using the two pieces of yellow that were set aside at the start we will begin our wings. Fold each wing in half and felt the wing on the foam pad into your desired shape and thickness.
Keep the “top” of the wing unfelted as this will act like glue when it’s attached to the chick. This unfelted bit helps to create a smoother transition from the wing to the body. Do a pinch test to know you are done.
Once you are finished felting one side, peel the wool off of the pad. The backside will be fuzzy, felt this side next. Once both sides are felted you are ready for the next step.

Attach your wings by felting the “glue” of the wing onto the body. I like to felt the top and farside of the wing down while keeping the front of the wing unfelted. Give the wings a little tug to make sure they are secured to the body.
Chirp chirp. Relish in the cuteness of the little chick you’ve created!
Felting the egg

Start by wrapping the egg with the inside color wool. I find it is easier to wrap if the wool is in long pieces. Do your best to wrap somewhat evenly, spread the wool out to cover all areas of the egg. You may find it helpful to wrap in different directions.

Use your outer color next. You will want your egg to have the thickness of two layers. If it is too thin it will not hold its shape as well and if it’s too thick it will not felt as well on the inside.
Add accents of little wisps of the third color. Allow the outer color to be visible in areas to create a marbling of colors.

Carefully pull the nylon over the egg. Do your best to keep the wool around the egg in place. It will slide around a little, that is ok. It can be nice to have an extra set of hands helping you here. One holding the egg, the other pulling the nylon over.

Now it is time to begin the wet felting process! First get your hand completely wet and very soapy. Then put your hands AND the wrapped egg into warm water.
This is a perfect time to involve children in the felting process! GENTLY transfer the egg back and forth between your palms. The wool around the egg will feel loose. The nylon will help the wool stay in place and not slide off the egg.
SLOWLY the wool will begin to feel firmer. As it felts you can apply more pressure to the felted egg and begin to agitate the wool more aggressively between your hands. This process will likely take at least 30 minutes. The warm water and soap will need to be replenished often.
When you feel the wool is evenly felted around the egg, carefully pull off the nylon. Yes, it will have felted to the nylon too! Continue to wet felt until the fiber are tightly felted. Do a “pinch test” to see if it’s done! Lastly, rinse under cold water to remove soap. Let dry overnight or put in the dryer.
Finish your felting project

Once dry, cut the middle of the egg open using sharp scissors and remove the plastic egg. Consider where you want the opening to be oriented and how big. I like to cut across the width of the egg, a little bit less then half way around. Do NOT cut it completely in half.

Pop the egg out of the wool. You may need to apply a bit of pressure to get the egg out, don’t worry the wool is well felted and can be withstand being squished and pulled.

Add a decorative blanket stitch to your egg if you’d like using your tapestry needle and thread. Pop your chick inside the egg and add to nature table.

Isabel of @thefeltedacorns was introduced to felting as a child attending her local Waldorf School on Cape Cod, Massachusetts. Years later she rediscovered felting as a therapeutic art form and went on to become a Waldorf Teacher. Thinking fondly of the little egg and chick that always appeared in her parents’ home in the springtime, Isabel wished to teach her class how to make what had become a little token of spring. And now she's taught you too!


Leave a comment